I chose to head straight up to the 3rd floor reading room, as this space is probably the closest thing in Seattle to jolly old England...and I'm thinking ahead to the workshop I'll be teaching this summer at the Manchester symposium, called "Soaring Spaces"...encouraging everyone to LOOK UP!!
Here is a step-by-step of my process for constructing and completing this sketch--it's the same basic process that I show in my Seattle workshops, Craftsy class online, and that I show in the upcoming book, Understanding Perspective. The "shape of the space" is pretty simple, but wow, I had forgotten how complicated arches and vaults can be.
But as I always say, perspective is easy when you know what to look for...and this is what you look for!!!
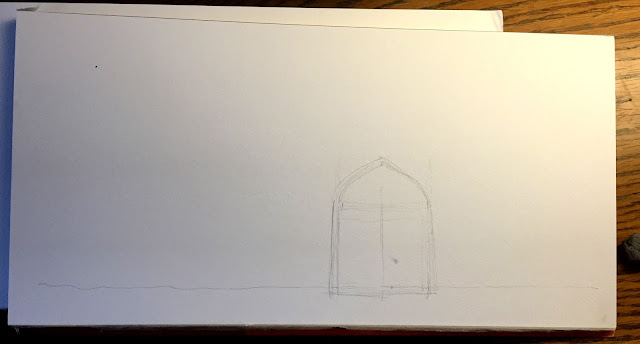
Step ONE, I hold up my pencil and usually measure the vertical line on the left, then use my pencil to also measure the width...all to get the correct proportions of the "Shape of the Space". I transfer the shape to my paper, slightly off center to the right, small enough that I'll have room to show the space in the sketch. I also place this shape very low on my paper, as I want to be able to draw a lot of the ceiling...this is "Soaring Spaces" after all!!!!.
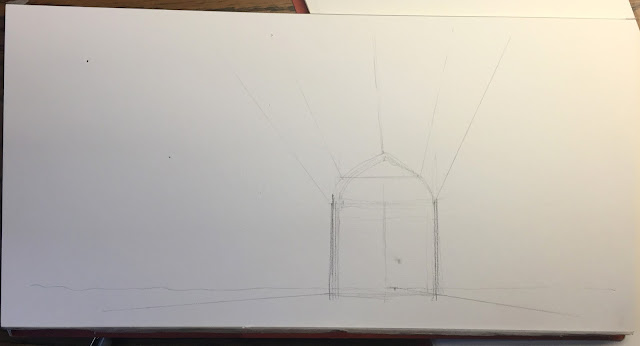
Then I locate my eye level and mark it in my sketch by drawing a horizontal line all the way across my paper...notice how LOW my eye level is relative to the shape of the space drawn. And on the eye level line is the vanishing point, that tiny dot just to the right of center. That spot is directly in front of me as I face the back wall of the space, and it's the point where the many receding lines will all converge...
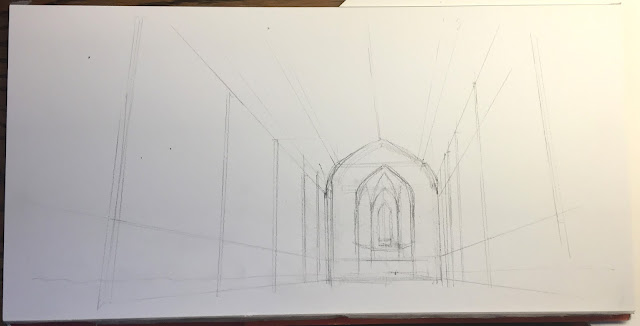
Step TWO--by drawing in the three elements of step one, I have everything I need to do this drawing accurately in perspective. I can use the vanishing point to start drawing in the big lines, the major architectural elements of the space. For this, I use a small plastic triangle, as it speeds things up to be able to snap accurate lines QUICKLY...
Step THREE-- you can see I'm putting more of the bones in...the verticals represent the columns, or each structural bay of the space. I start to angle the lines closest to me to exaggerate the sense of height.
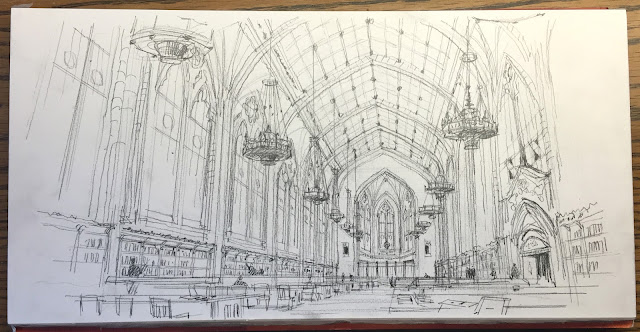
Step FOUR-- I start working on putting in the ceiling...big shapes get broken down into smaller shapes, then I break those shapes into even smaller shapes...that is how structure works! I also start to put in the chandeliers, as they cover up a good bit of the ceiling. Each one relates to a structural bay in the ceiling, and the lamps on the left relate to the lamps on the right.
Step FIVE-- her is pretty much the complete line drawing. I try to build up the focus with detail and linework at the back, allowing the lines closest to me to fade out. I also added the book shelves, as that builds up the sense of activity at the pedestrian level and helps to ground the sketch. Notice how FLAT the tables are because they are so close to my eye level. Notice how details are just suggested, I don't take the time to actually draw in every detail.
Step SIX--Color...I started by putting an underpainting layer of yellow on all the areas I want to be warm, usually the surfaces that advance spatially or are in the sunlight (what little there was!) Then I layer in more colors...mostly grays, as nearly everything in this space was gray to beige...I also build up the color carefully at the end of the space, the focal point of the perspective and the sketch.
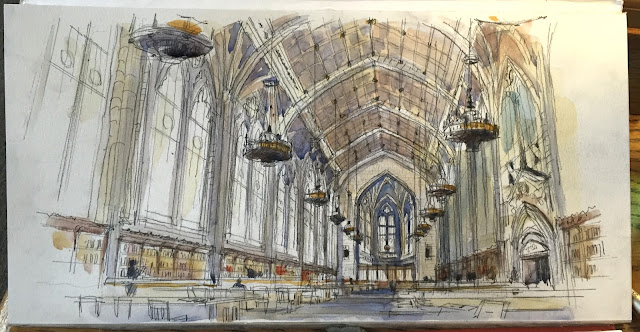
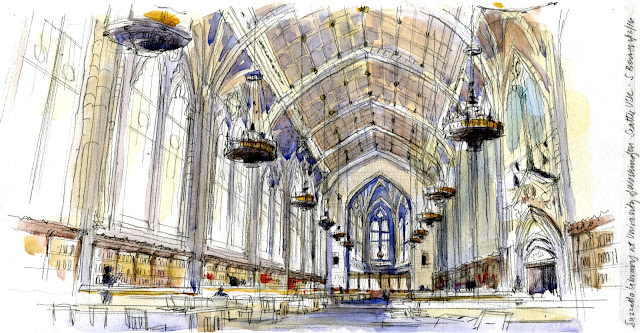
And here is a scan of the final image, complete with signature and reminder of where I was! Also a detail so you can actually see the linework. I often lose a lot of the linework once I add color, which always makes me a little sad, as I LOVE the pencil work.
And there it is, beginning to end. Good practice for England this summer!! It took about 1 hour and 15 minutes, sketched and painted on location. Paper is a Fluid watercolor block 8" x 16", Winsor & Newton watercolors, and my favorite Escoda Reserva size 10 travel brush. Also my 1" angled synthetic brush.
If you found this explanation helpful, please leave a comment below... it would be great to get a sense for how many people actually look at this blog! I will continue posting more sketches that show the process I use. Thanks very much!



Hi Stephanie, This is extremely helpful. It's just fabulous the way it all comes together. I'm booked into your first workshop in Manchester which I'm looking forward to. Meanwhile I'll do some practice. Will you also be demonstrating the painting in Manchester if time permits?
ReplyDeleteIt's so interesting to see the step-by-step process and to read your thoughts on color. Beautiful! Thanks so much for sharing!
ReplyDeleteStephanie, this is truly wonderful.. Such a detailed explanation and the finished product with supple colours is lovely. Im so sorry to miss your workshop but hope to meet you one day ..
ReplyDeleteThank you so much for posting Stephanie. I do read and enjoy your blog! And I took your Craftsy class too, which was also excellent.
ReplyDeleteAn outstanding sketch Stephanie, wonderful step by step.
ReplyDeleteThank you Stephanie, your work is amazing and the step by step so very interesting. You make it seem so simple !! I took your Craftsy class and I keep watching it again and again...
ReplyDeleteA great simplification of your process - and so cool to see the steps broken out. I just preordered your book on Amazon - looking forward to it!
ReplyDeleteVery interesting. My attempts at interior sketches of churches always ended in a mess since I didn't have a plan and just began somewhere. With your "big lines" set up, every thing just seems to fall into place as you go along. Wonderful! Thanks very much for the enlightenment.
ReplyDeleteA terrific example of applying your methodology and what you teach in your classes. I find it extremely helpful when you demonstrate process and can see your approach to subjects. I enjoy learning the "why" behind a painting. Being able to see the process is more meaningful than reading the process. Thanks and I hope you'll continue to do this kind of posting.
ReplyDeleteFrank B
Really interesting to understand the steps to produce such an accurate, intricate drawing.
ReplyDeleteThank you so much Stephanie, for taking the time and sharing...Best regards
ReplyDelete:)
So wonderful to see your example. Thanks for posting this.
ReplyDeleteThank you for sharing your process for capturing space in your drawings.
ReplyDeleteMore please.
It's great to see your process. Thank you for posting!
ReplyDeleteThank you for the step-by-step. You do a great job of breaking it down, and make it look so easy. The finished product is beautiful. I took your Craftsy class and learned a lot. This is a great sequal to the class. Would love to take an in person workshop if you ever make it to Raleigh, NC.
ReplyDeleteThank you Stephanie for taking the time to share your process of creating a beautiful work of art. I always love to see your pencil lines shining through!
ReplyDeleteYes, yes! I love your work, and I appreciate your explanations, and the step-by-step views. You make it look easy, yet the scene is so complex. Thanks for sharing!!
ReplyDeleteStephanie
ReplyDeleteSome time ago I enrolled on your Craftsy class and really enjoyed the way you were able to simplify perspective for me. It had always been a daunting aspect of my sketching but you helped me "eat the elephant bit by bit"
This blog has renewed my enthusiasm for tackling architecture. Thank you !
Mike
This is gorgeous, and I so appreciate the time you took to share your step-by-step process. I've purchased your class on Craftsy, and am looking forward to getting immersed in it when I get home from vacation. I follow your blog, but am not good about commenting.
ReplyDeletegreat tutorial - thank you! wishing you well, cheers!
ReplyDeleteThank you so much for this tutorial. It is such a help seeing the step by step process. I'm going to take my sketchbook out to my farm's old cowshed right now - not quite such an ornate structure as the reading room but good for practice!
ReplyDeleteAs much as I love your blog, this is the best post ever! Thanks for the step by step instructions. They are very clear and easy to follow. You did a great job.
ReplyDeleteI bought your Craftsy/class and it so helpful,,,love this article I can't wait to get your new book..that's for sharing,,,I love to study perspective,,,
ReplyDeleteI've always wanted to sketch buildings and this was a fantastic intro!!
ReplyDeleteLove the article. Great explanation and great drawing. Thanks Stephany
ReplyDeleteI have to read it again,I love this article so much!,, thanks a million,,,do you have workshops here in USA,,I can wait for more classes in caftsy ,maybe?..please ....
ReplyDeleteHi Stephanie ! Yes I go on your blog everyday to see if there is a new post and another of your so beautiful sketches. Your step by step process is really a huge help for me ! Please continue....and I would love to take another Craftsy class made by you ...
ReplyDeleteThanks Stephanie. I enjoy your Craftsy class and still go back to it and your blog is a great addition to it. Please do keep it going, I still have a lot to learn. Ingrid.
ReplyDeletetThank you for this great step by step explanation . I am new to sketching so this is especially helpful. I also signed up for your Craftsy class.
ReplyDeleteThank you for the excellent post Stephanie! Great to see your step-by-step process. I'm enrolled in your workshop in Manchester and looking forward to learning more.
ReplyDeleteBeautiful sketch and a really concise and well written piece on your working process. Looking forward to Manchester.
ReplyDeleteThis is very helpful, I will try to attend your class in Manchester also
ReplyDeleteThis post is very helpful for beginner sketchers like me! Thanks.
ReplyDeleteThis looks great! It makes me want to tackle a more complex scene. What do you use for the yellow when you warm up the areas?
ReplyDeleteThank you for sharing the process of perspective. It's daunting and I appreciate how you describe it simply. I love your work and have purchased the crafty class but not started it yet. Someday I hope to attend your Seattle or Italy class, and in the meantime will try to get over my shyness of working in public.
ReplyDeleteI also really liked this post. I took your craftsy class and loved the feedback. Would also like to take your Seattle workshop someday. I like seeing the sketch as you go and what details you leave out. I also like seeing your choice of colors.
ReplyDeleteYou explained the steps extremely well and it would be very useful for beginners and a good reminder to the intermediate drawer. The duration is interesting to note too. I enjoy looking at how someone has captured a place with minimal lines or brushstrokes so it's great seeing the step by step here. Yes - I am that person with their nose up against the paintings ...
ReplyDeleteCrystal clear explanation! I'm meeting with a sketching friend tomorrow in Chattanooga and I'll be looking for a soaring space - you've inspired me, thanks.
ReplyDeleteI read it! This post is fantastic and so generous of you. It helps to see it over and over. Thank you.
ReplyDeleteI read it! This post is fantastic and so generous of you. It helps to see it over and over. Thank you.
ReplyDeleteThis is extremely helpful to see a step by step process with explanation. I went to the UW and have been in Suzzallo so this brings back memories. I don't think I would ever tackle this scene but you show me that by breaking it down it is possible. Thanks!
ReplyDeletei have taken your Craftsy course and this post is the icing on the cake! I am travelling from Australia to Europe in three weeks and will try to remember your lessons. I wish the book was already for sale so iI could take it with me!!!! Thanks Stephanie !!!!
ReplyDeleteThanks, Patricia...have a great trip and sketch a lot...sounds wonderful!
DeleteS
Love your blog! It's been so helpful and informative. And it inspires me to get out to sketch more.
ReplyDeleteAlso, your Craftsy class took my fear of drawing the inside of buildings and threw it out the window! Thank you thank you thank you! Can't wait to take your next class.
HI Patricia, thank you so much! That's what every teacher loves to hear, that the class helped you to overcome the fear of drawing...I'm so glad!
DeleteI'll be posting a discount link to the new class, "Essentials of Sketching Architecture", here on my blog, so stay tuned. And thanks again for your message! I really loved seeing all the replies to this post...
S
I just discovered your blog through Doodlewash and am in love with your style and abilities! I, too, work in the field of architecture and began sketching (pencil/ink and watercolor) on a study abroad when I was in architecture school and have recently been trying to get back into the habit so your blog has been not only very inspiring but was a timely discovery as well! I'm so happy I've discovered you! :-)
ReplyDelete-karen
Greetings! Thanks so much for this step by step post. Perspective can be tricky. This helps so much! Keep up the great work.
ReplyDelete