Stephanie Bower


Stephanie Bower | Architectural Illustration: www.stephaniebower.com | Sketching Workshops: www.stephaniebower.com | Sketches: on Instagram at @stephanieabower & http://www.flickr.com/photos/83075812@N07/ | Urban Sketchers Blog Correspondent www.urbansketchers.org | Signature member of the Northwest Watercolor Society
Showing posts with label Urban Sketchers. Show all posts

Friday, January 18, 2019

Suzzallo Library, a Step-by-Step


I'm thinking ahead to this summer's Urban Sketching Symposium in Amsterdam! Registration starts bright and early February 2, info is here. There are so many amazing workshops planned, I am truly honored to be a part of the incredible line up of instructors. I'll be teaching a workshop called "Towers are Like Wedding Cakes, and other "Ah-Ha" Moments", featuring some tips and tricks that have inspired a new book I'm working on!

I love to teach perspective because it's something so many people fear, ignore, or fake, but there is no need if you understand a few simple principals.

In honor of this Sunday's Seattle Urban Sketchers meet-up at the University of Washington's Suzzallo Library, I'm posting this step-by-step from a few years ago in order to show 
my very "architectural" process for constructing and completing a perspective sketch.
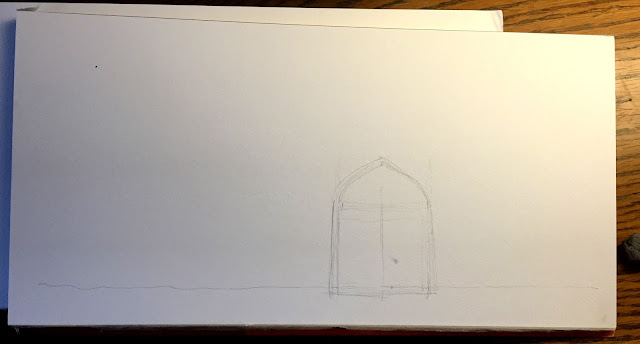


Step ONE, Looking at the view ahead of me, I simplify what I see to a very basic shape, starting with a rectangle. This is basically what I call the "shape of the space", as if you were to slice the room like a loaf of bread, this is the shape you would see. It's the shape of the end wall. I measure the height and width with my pencil, then I transfer that shape to my paper. I place this shape very low on my paper, as I want to be able to draw a lot of the ceiling.

Then I locate my eye level and mark it in my sketch by drawing a horizontal line all the way across my paper...notice how LOW my eye level is relative to the shape of the space drawn. almost on the floor. On the eye level line is the vanishing point, that tiny dot just to the right of center (not the smudge right above it!) That spot is directly in front of me as I face the back wall of the space, and it's the point where the many receding lines will all converge, making this a one-point perspective sketch.
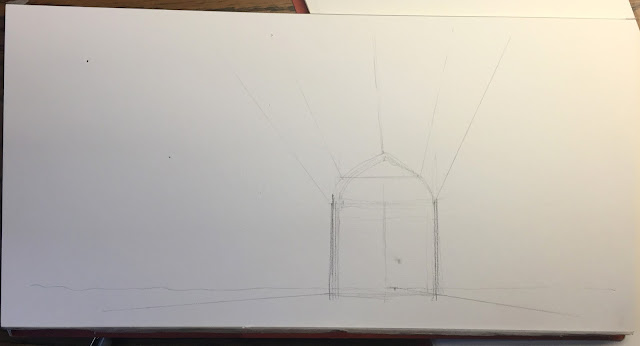

Step TWO--by drawing in the three elements of step one (big shape, vanishing point, eye level), I have everything I need to do this drawing accurately in perspective. I can use the vanishing point to start drawing in the big lines, the major architectural elements of the space.  For this, I use a small plastic triangle, as it speeds things up to be able to snap accurate lines QUICKLY...
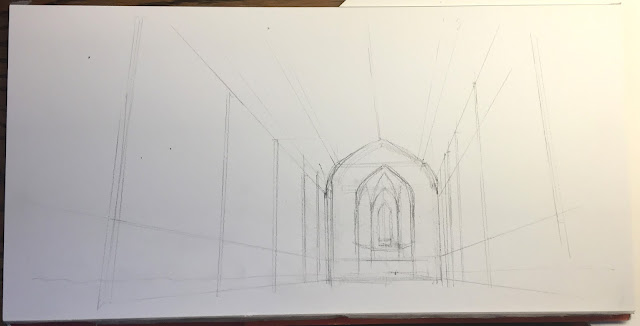


Step THREE-- you can see I'm putting more of the bones in...the verticals represent the columns, or each structural bay of the space.  I start to angle the lines closest to me to exaggerate the sense of height.


Step FOUR-- I start working on putting in the ceiling...big shapes get broken down into smaller shapes, then I break those shapes into even smaller shapes...that is how structure works!  I also start to put in the chandeliers, as they cover up a good bit of the ceiling. Each one relates to a structural bay in the ceiling, and the lamps on the left relate to the lamps on the right.
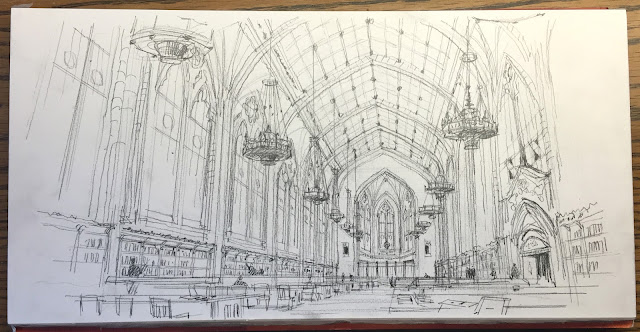


Step FIVE-- here is pretty much the complete line drawing.  I try to build up the focus with detail and linework at the back, allowing the lines closest to me to fade out.  I also added the book shelves, as that builds up the sense of activity at the pedestrian level and helps to ground the sketch.  Notice how FLAT the tables are because they are so close to my eye level. Notice how details are just suggested, I don't take the time to actually draw in every detail.
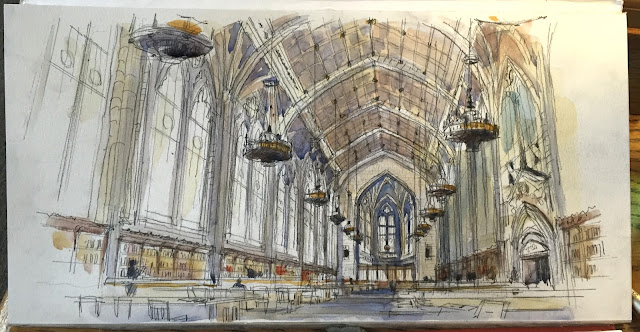


Step SIX--Color...I started by putting an underpainting layer of yellow on all the areas I want to be warm, usually the surfaces that advance spatially or are in the sunlight (what little there was!)  Then I layer in more colors...mostly grays, as nearly everything in this space was gray to beige...I also build up the color carefully at the end of the space, the focal point of the perspective and the sketch.


And here is a scan of the final image, complete with signature and reminder of where I was! Also a detail so you can actually see the linework.  I often lose a lot of the linework once I add color, which always makes me a little sad, as I LOVE the pencil work. 
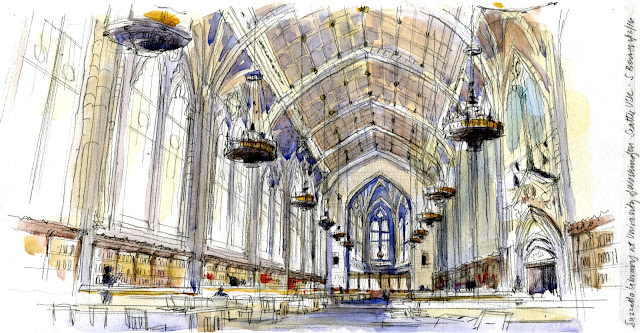


So there it is, beginning to end.  Good practice for Amsterdam this summer!! It took about 1 hour and 15 minutes, sketched and painted on location. Paper is a Fluid watercolor block 8" x 16", Winsor & Newton watercolors, and my favorite Escoda Reserva size 10 travel brush. Also my 1" angled synthetic brush. for broad strokes in big areas.


I hope you found this helpful...see you in Amsterdam at the Symposium !


Monday, September 17, 2018

Necessity is the Mother of Invention...


Sketching at the Kimbell Art Museum in Fort Worth, TX.

Urban Sketchers are such creative people! We figure out all kinds of workarounds and tools to make location sketching easier and better!
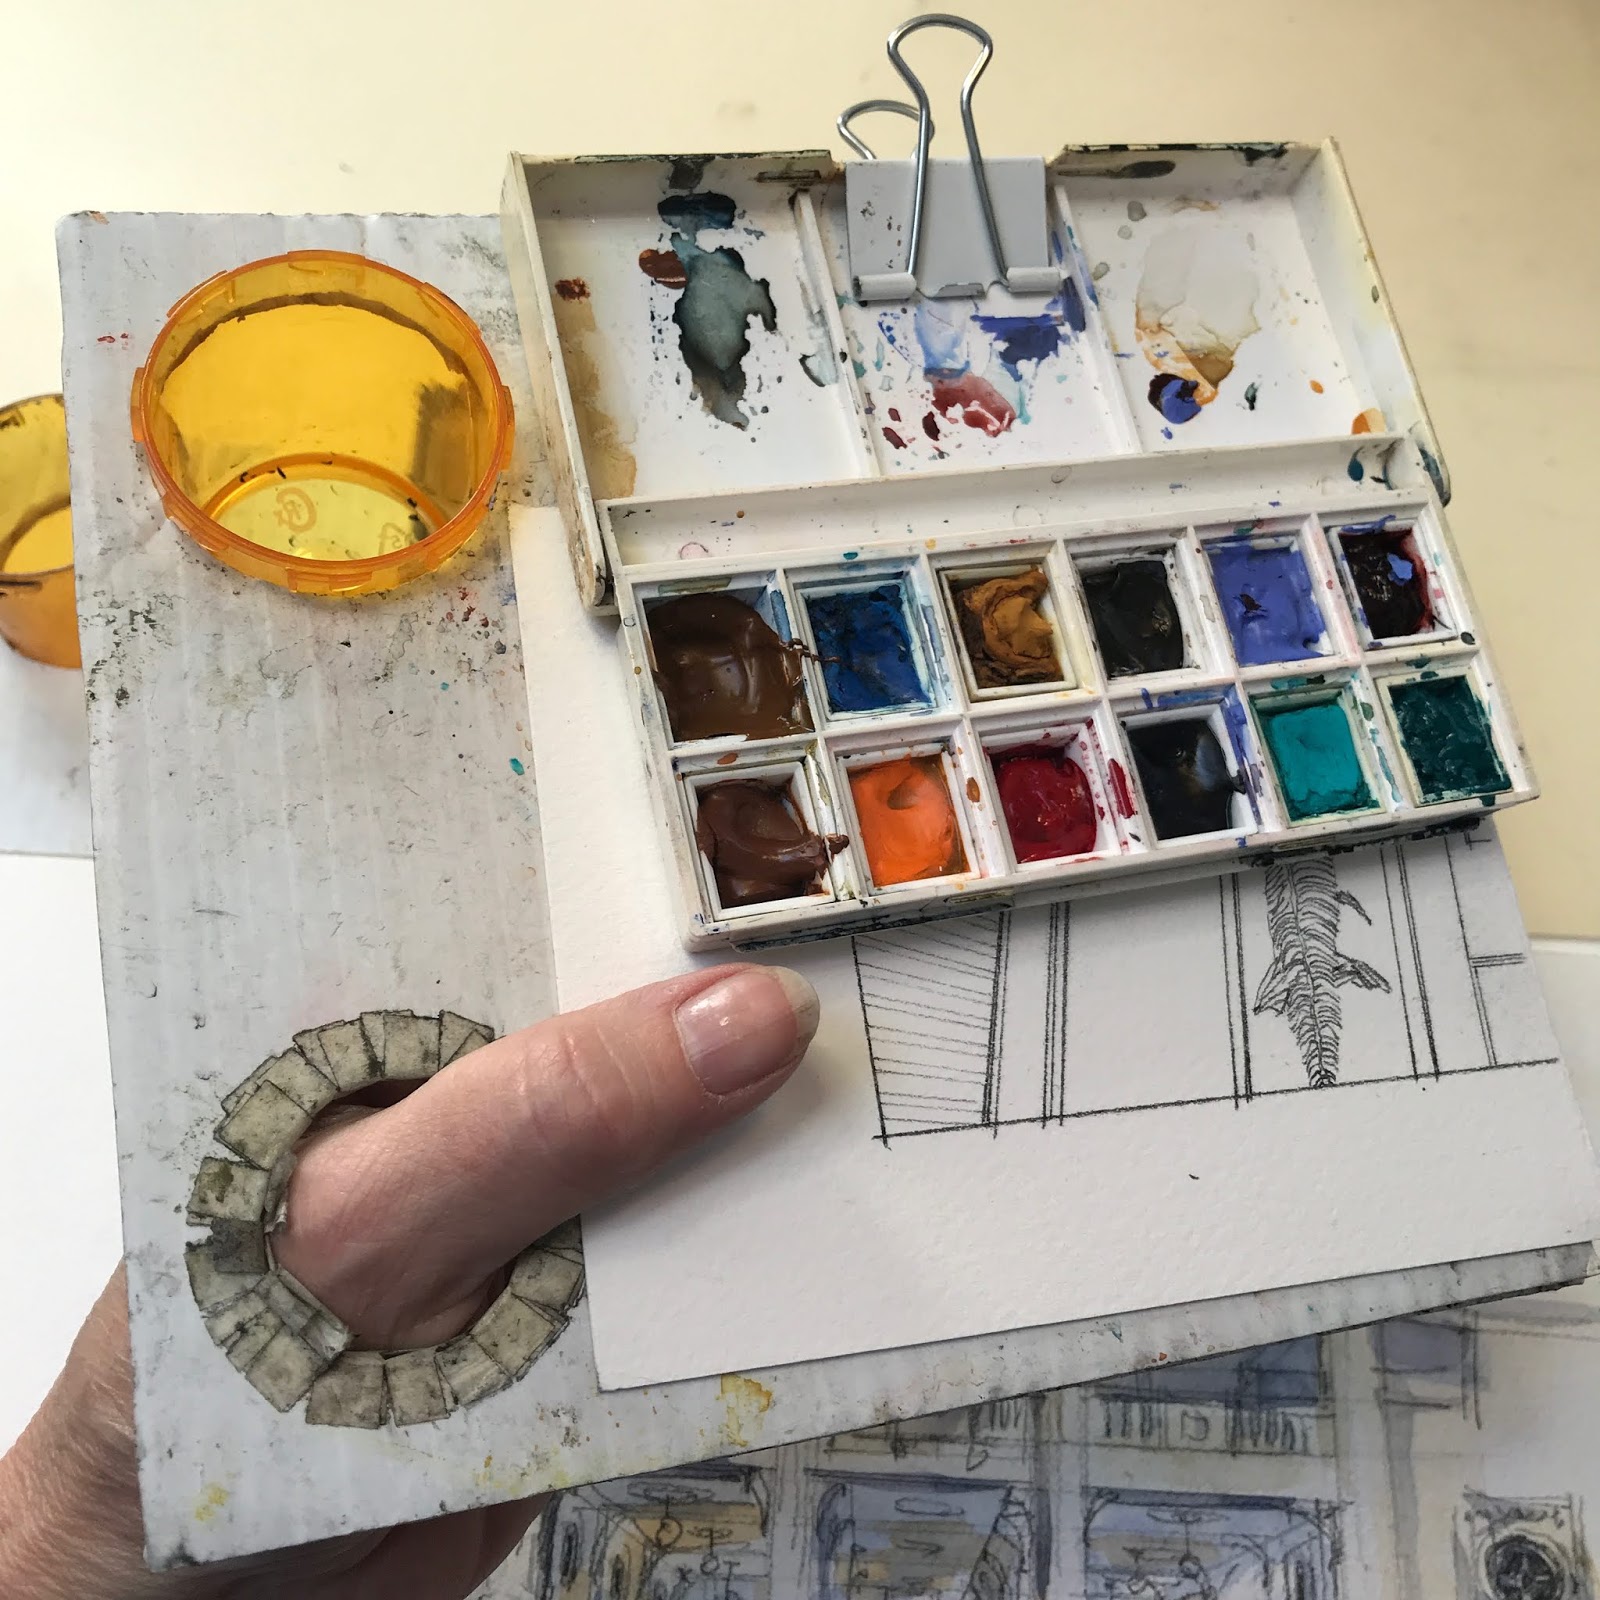
     Those of you who have seen me work in person know that I like to use a tripod/easel and a hand-held palette (for lack of a better word) for painting on location. I've found the easel is essential when I teach, so that people can better see what I'm doing (thanks to the workshop participant years ago who suggested this!) This invention came about after seeing variations on what other sketchers had, so I came up with my own version that uses a medicine bottle...it works great! It's approximately 7.5" x 6.5" and cut from corrugated plastic.

In India, however, I was not permitted to take the easel into a lot of the famous architectural sites. As luck would have it, right before I left, I happened to make a larger surface to use. I can still attach my paints, paper and water, but it sits in my lap! I found it worked pretty well, so now I carry it with me when I go out to sketch--its lighter than the easel, which is great. The size is 12" x 15"--the largest I could make that fit in my backpack.The only trick is remembering to slant it a bit when painting!

Here are the two versions I now use...the older tried and true hand-held palette, and the newer lap version...what do you think?

In Varanasi, India last November 2017,


At the AMAZING Ellora Caves in Aurangabad, India.

In Rome, June 2017, with the talented Kelly Medford.


In Italy last May 2017, during the Draw Civita workshop.
Thank you, Vanni, for this great photo!!

And sometimes, I just sit on the ground and use my tiny stool as an easel...

On the grass at an important Buddhist site in Sarnath, India, 2017.

All these methods work great, depending on the situation. Have you tried any of these palettes?

Tuesday, July 17, 2018

TIP 10/10: Domes are ROUND!


And here is the final post in this series of 10 TIPS!

Sketching Tip #10: Domes are ROUND!

This may seem rather obvious, but I see so many sketchers draw domes as sort of flattened out the shapes in which the "edges" are drawn as if they were sharp corners instead of rounded.

Domes are essentially a stack of ellipses, each ellipse sharing a common centerline. Take a look at this diagram of the round Radcliffe Camera done in my workshop in Oxford, England last year:


You'll notice that this building, similar to a dome, is a stack of ellipses in perspective.
All the ellipses are centered on one line in the middle that also connects the
very top of the dome with the center of the footprint of the building on the ground.  

You'll also notice that each ellipse gets FLATTER the closer it is to your eye level line.

Understanding this concept points out why the diagram of the flattened dome with "corners" is incorrect, and the rounded dome edge below works much better!


Domes don't have sharp corners!!


The "edges" of your dome should look more like this. They are rounded and
you can see the shape of the ellipse starting to curve behind the building.

And here is the completed sketch! You can see and feel the roundedness of the forms, especially by looking at the rounded "edges".


These same concepts apply to any rounded form. Take a look at this sketch of a building near Piccadilly Circus in London...


I hope you have enjoyed and learned a bit from these 10 blog posts! I will continue to post tips and more sketches, so please sign up to receive these posts by email using the sign up on the bar on the right.

And if you want to learn in person, I'll be teaching workshops next year in Spain and Italy...and more places too! 
I also have two online classes at Craftsy.com and a book you can find anywhere, 
The Urban Sketching Handbook: Understanding Perspective.

Thank you so much for your interest, and Happy Sketching!
Remember, don't fear perspective!!
Stephanie


Saturday, July 7, 2018

TIP 6/10: Sloped Roofs in Perspective


Sketching Tip #6:  Sloped Roofs in Perspective

Sketching a sloped roof, or any sloped surface, can be a real challenge. I pretty much always draw lines down the slope of the roof so that the angle of the roof reads, no matter what the roof material is. The clearest way to understand this is to look at tile roofs with ridges and valleys, like this one at Brunelleschi's  Pazzi Chapel in Florence in this classic, one-point perspective view.

Step one is to find the vanishing point and your eye level for most of the parallel horizontal building and ground lines. My eye level line was very low, close to the ground, and the VP just to the right of center.


To draw the slope of the roof correctly, the first line I draw on the sloped roof is a true vertical line (in yellow) directly above my vanishing point at eye level... yep, straight up and down right over my vanishing point! 
Then, I know that all the ridges and valleys to the left of this line angle in one direction, and all the lines to the right of this vertical line angle in the other direction. The farther the line is away from my vertical, the flatter the angle.  I usually eye-ball this. 
Take a look...


So what is really going on here? Remember that lines that are parallel to each other converge to the same vanishing point, so since the roof is angled, it goes to its own vanishing point in the sky...

Remember this tip: 
if a surface tilts UP and away from you, the Vanishing Point also tilts UP.
The part that most people don't realize is that the vanishing point for the slope is directly over your eye level vanishing point!!


This principle is also true for 2-point perspectives, but it's easiest to see in a 1-point view.

Look at this view from Florence and see if you can find the vanishing point and how I drew the tile roofs!


Thursday, July 5, 2018

TIP 4/10: Lines Get Flatter at your Eye Level

Welcome to today's sketching tip~

#4: Lines Get Flatter at your Eye Level

Well, technically speaking, lines and shapes appear flatter the closer they are to your eye level. In perspective-speak, 
this is called "foreshortening", and it's another reason why knowing where your Eye Level Line is can be so helpful.

The sketch that comes to my mind regarding this concept is one from the interior at the Duomo in Orvieto, Italy. I only had a little over an hour to do this sketch, so sitting on the floor midst bird poop at the very back of the cathedral, I relied heavily on knowing about foreshortening.  

Let's analyze this view.


First, know where your eye level is and draw that line all the way across your page as you start your sketch. I do this every time, be it in a sketch or an architectural Illustration. It's helpful in so many ways. You can see where I drew this line in lightly in my sketch (highlighted in turquoise in the mark-up). In most of your sketches, your eye level will probably be close to the floor and very low on your sketchbook page.

Now that I know where my eye level line is, I know that 
-- receding lines ABOVE it will angle DOWN to my vanishing point in the distance, and 
-- receding lines BELOW it will angle UP to my vanishing point.

I also know that :
--  lines will appear flatter the closer they are to my eye level, again, a useful reference (especially in a two-point perspective when the vanishing points are off your sketchbook page!)

Try drawing in your Eye Level Line in your sketches, then you'll know that even when the vanishing point is way off your page, as in a two-point perspective, you KNOW the receding lines will get flatter the closer they are to your eye level.

And, referring back to Tip #3, you'll see that the people who are closest to me appear a little taller...this is because I was sitting on the ground!

I invite you to please sign up for this listserve to receive regular posts about sketching, perspective, painting, workshops and more! Thank you!!

Monday, February 19, 2018

What I Learned about Sketching on a Trip to India, #4 & #5


And here are tips #4 and #5...

4. It takes me at least a week to warm up. 
I had to push through the first few weeks of making sketches I didn't like in order to figure out how to draw and paint in India. Every place is different--different humidity (affects watercolor drying time), different colors (in Seattle, everything is gray, so the colors of India were definitely challenging), different building building and plants that I have to figure out how to represent. 

This is why instructors show up early at the symposiums...we might sketch all the time, but being in a new place requires a bit of reinvention and figuring out how to work in a new place with different variables.

Queen's Bath at Hampi--it's worth a trip to India to see this place.
This was one of the first sketches that I liked...in part because I found a spot where I could sketch without many interruptions. Plus, this amazing architecture was so inspiring!

5. Post your sketches as you go, if you can. 

I found that Facebook was slow to come up on my phone, but Instagram was very fast and worked better on the road. That is why I finally started posting to Instagram! It was fun to watch the numbers grow and also respond to comments along the way.

It's much harder to post when I'm back home and the realities of work and home, plus, it's exciting to share where you are WHEN you are there! I posted a lot compared to other trips I've taken, thanks primarily to the ease of Instagram and paying extra for higher speed data on my phone.

Tuesday, February 6, 2018

What I Learned about Sketching on a Trip to India, Part 1


Namaste. For 3.5 weeks in October/November, I visited India for a second time. The first trip was in 2011, and the sketchbooks I filled on that trip have sparked so many wonderful opportunities to travel and teach. My parents also lived here before I was born, so India holds a special place in my heart. There are so many utterly amazing sights and colors at every turn--all of life is here.

I set out to sketch my way across central and southern India... and wow, did I learn a lot, just not what I thought I would learn! The sketching did not turn out as I expected...and while very frustrating at the time, that in itself was a good learning experience. That frustration has helped me to figure out what works for me and what doesn't. 

I posted ALL 50 sketches in order on Instagram  @stephanieabower and photos at @stephanieabower.fotos, including lots of sketches I really don't like. Might not be smart to tip my cards like that, but it's all a process, right? This is how we learn and grow. 

To that end, here is some of what I learned in a series of posts!


1.  Don't bring everything--EDIT your supplies and keep everything light.

Varanasi has to be one of the most amazing cities in the world, certainly one of the oldest. At breakfast on the roof of the B&B, I'd sketch the river walking up.


Yep, I brought too much paper, which weighs a ton to carry. I ended up filling only one Pentalic 7" x 10" sketchbook (which worked perfectly when I put multiple images across two pages) and one block of Fluid watercolor paper, 8"x16" for larger sketches. I also was not allowed to use my easel and tripod many places, so luckily, I brought a large piece of corrugated plastic to which I just clipped everything, holding it all in my lap for painting. It worked pretty well and was much lighter. 

I have to sit when I sketch, so my super light Tribe Provisions 3-leg stool was essential and often doubled as an easel when I sat on the ground. Where the ground was uneven or dirty, I had a small, virtually weightless square of foam to sit on. I lugged pens and ink but always just went back to pencil. Luckily, a little bit of watercolor goes a long way, so I didn't have to bring much paint. I put everything into one backpack and one carry on!


Old City, Varanasi. Sketching drew a crowd and constant selfie requests everywhere we went. Here I am using the large corrugated plastic base with everything clipped to it, resting on my bag in my lap. I cut a hole to hold the medicine bottle water container.

Monday, May 16, 2016

Another Step-by-Step, King Street Station

This past weekend, 15 folks from Canada, Oregon, Eastern Washington, St. Louis, and the Seattle area all joined me at Pike Place Market for an Urban Sketchers workshop I call Good Bones. It was a great group that worked hard! 

Most of the participants were able to join the Seattle Urban Sketchers monthly outing on Sunday, May 15...this is the sequence I sketched on Sunday at King Street Station, Seattle--another post to show the process of creating these views!


Thursday, August 1, 2013

Hit 97 degrees in Paris Today

...and almost NOTHING is air conditioned.  Not even the Louvre has air conditioning! 

Paris is an oven. 

My apartment at the Cité faces south, with tilt windows that only open about 6 inches, so even with my little fan going full blast, it's really really hot.  I had to escape in the afternoon today and tomorrow too, although I'm not really sure it's any better outside.

Much of Paris is gone in late July and August, but I think all the people that didn't go to the country or the coast were dancing along the Seine last night.  It was really amazing...on the shady side just east of Pont de Sully, tons of people found their favorite music and kicked up their heals in style--Parisian women in their typical tight fitting dresses and heals, and they seem to all be slender too, and the men sort of following along from what I saw.  These folks took their dancing very seriously.

Different spots had different music--I was sketching at the spot for swing music,
but only a few feet away next door were the tango dancers...and Paris Urban Sketchers capturing their every move!  I also heard latin music, and who knows what else.  It really looked like fun, and it is much to hot to be indoors. Tons of people in large and small groups dotted the banks with pretty great looking picnics.

Tomorrow, I'll spend the afternoon sketching at my favorite church, Saint Eustache, where it will hopefully be cool and quiet.

Swing dancing along the Seine, near Pont de Sully and the Ile Saint Louis. July31.
This sketch may be better as two separate halves...hmmm...

Tuesday, April 2, 2013

Welcome to Drawing Perspectives

Thank you for checking out my new blog, Drawing Perspectives!  On this blog, I hope to post my perspectives on sketching, painting, teaching, as well as how-to's on drawing and watercolor, travel photos, and finding that illusive vanishing point... 


Where could this be?  It is even more stunning in person.

I'm Stephanie Bower, and I live and work in Seattle, Washington.  I've been an architect and architectural illustrator for 25 years or so, both here in Seattle and before that in New York City. I've been traveling and sketching for a long time! I've also taught perspective sketching for many years at Parsons The New School for Design in New York, briefly at the University of Washington (thank you, Frank Ching, for that opportunity!), and currently in the Design Department at Cornish College of the Arts.  As hand drawing disappears from the practice of architecture, I feel it is more important than ever to make sure the ability to draw stays alive and well in the profession.

Sketching attracts crowds in Kathmandu, Nepal, November 2011.

I have the great good fortune to have won an award, The Gabriel Prize, which will allow me to spend 3 months in Paris this summer, sketching and painting architecture and landscape every day--quite literally a dream come true.  This blog will be my online diary as I explore Paris, travel to Italy to teach a sketching workshop, and to Barcelona to participate in the Urban Sketcher's Symposium in July.

Thanks, and I hope you will stay tuned!

+  For more information on architectural illustration work, go to www.stephaniebower.com 
+  For more information or to sign up for the Civita Sketching Workshop 2013, go to www.stephaniebower.com and click on the link.
+  To view blog posts as a correspondent for Seattle Urban Sketchers, go to www.seattle.urbansketchers.org
+  To view a library of field and travel sketches, go to http://www.flickr.com/photos/83075812@N07/
+  To view information about the Gabriel Prize, go to 
http://www.gabrielprize.org/
+  To view information on the KRob Architectural Delineation Competition that is now on display at the Dallas AIA, go to 
http://krobarch.com/winners.asp?winner_year=2012