Stephanie Bower


Stephanie Bower | Architectural Illustration: www.stephaniebower.com | Sketching Workshops: www.stephaniebower.com | Sketches: on Instagram at @stephanieabower & http://www.flickr.com/photos/83075812@N07/ | Urban Sketchers Blog Correspondent www.urbansketchers.org | Signature member of the Northwest Watercolor Society
Showing posts with label learning to draw. Show all posts

Tuesday, July 17, 2018

TIP 10/10: Domes are ROUND!


And here is the final post in this series of 10 TIPS!

Sketching Tip #10: Domes are ROUND!

This may seem rather obvious, but I see so many sketchers draw domes as sort of flattened out the shapes in which the "edges" are drawn as if they were sharp corners instead of rounded.

Domes are essentially a stack of ellipses, each ellipse sharing a common centerline. Take a look at this diagram of the round Radcliffe Camera done in my workshop in Oxford, England last year:


You'll notice that this building, similar to a dome, is a stack of ellipses in perspective.
All the ellipses are centered on one line in the middle that also connects the
very top of the dome with the center of the footprint of the building on the ground.  

You'll also notice that each ellipse gets FLATTER the closer it is to your eye level line.

Understanding this concept points out why the diagram of the flattened dome with "corners" is incorrect, and the rounded dome edge below works much better!


Domes don't have sharp corners!!


The "edges" of your dome should look more like this. They are rounded and
you can see the shape of the ellipse starting to curve behind the building.

And here is the completed sketch! You can see and feel the roundedness of the forms, especially by looking at the rounded "edges".


These same concepts apply to any rounded form. Take a look at this sketch of a building near Piccadilly Circus in London...


I hope you have enjoyed and learned a bit from these 10 blog posts! I will continue to post tips and more sketches, so please sign up to receive these posts by email using the sign up on the bar on the right.

And if you want to learn in person, I'll be teaching workshops next year in Spain and Italy...and more places too! 
I also have two online classes at Craftsy.com and a book you can find anywhere, 
The Urban Sketching Handbook: Understanding Perspective.

Thank you so much for your interest, and Happy Sketching!
Remember, don't fear perspective!!
Stephanie



Friday, July 13, 2018

TIP 8/10: Towers are like Wedding Cakes


Only three more to go! Here is sketching tip #8 of 10...

Sketching Tip #8: Towers are like Wedding Cakes!


Imagine a wedding cake...if one layer is off-center from the one below it, eventually we'd get a tragic cake collapse and wedding disaster!


Same for Towers. I often see towers in sketches that somehow look a little off. The reason: it's layers are not stacked properly in perspective!

So how to better sketch a tower? I'll show you two ways.

Method 1 -- find the center of the tower.
     As in wedding cakes, it's important to establish where the center of the tower is in order to draw it properly. We do this in perspective by using your skills from middle school geometry class:  drawing diagonals.
     If you think of the forms as transparent, this is much easier. I look at a tower and I think of a stack of 3-d blocks, usually getting smaller/narrower toward the top. I often lightly draw in the entire center line up the arch for reference. You can be sure whatever detail is at the very top of the tower, it sits on top of your center line!


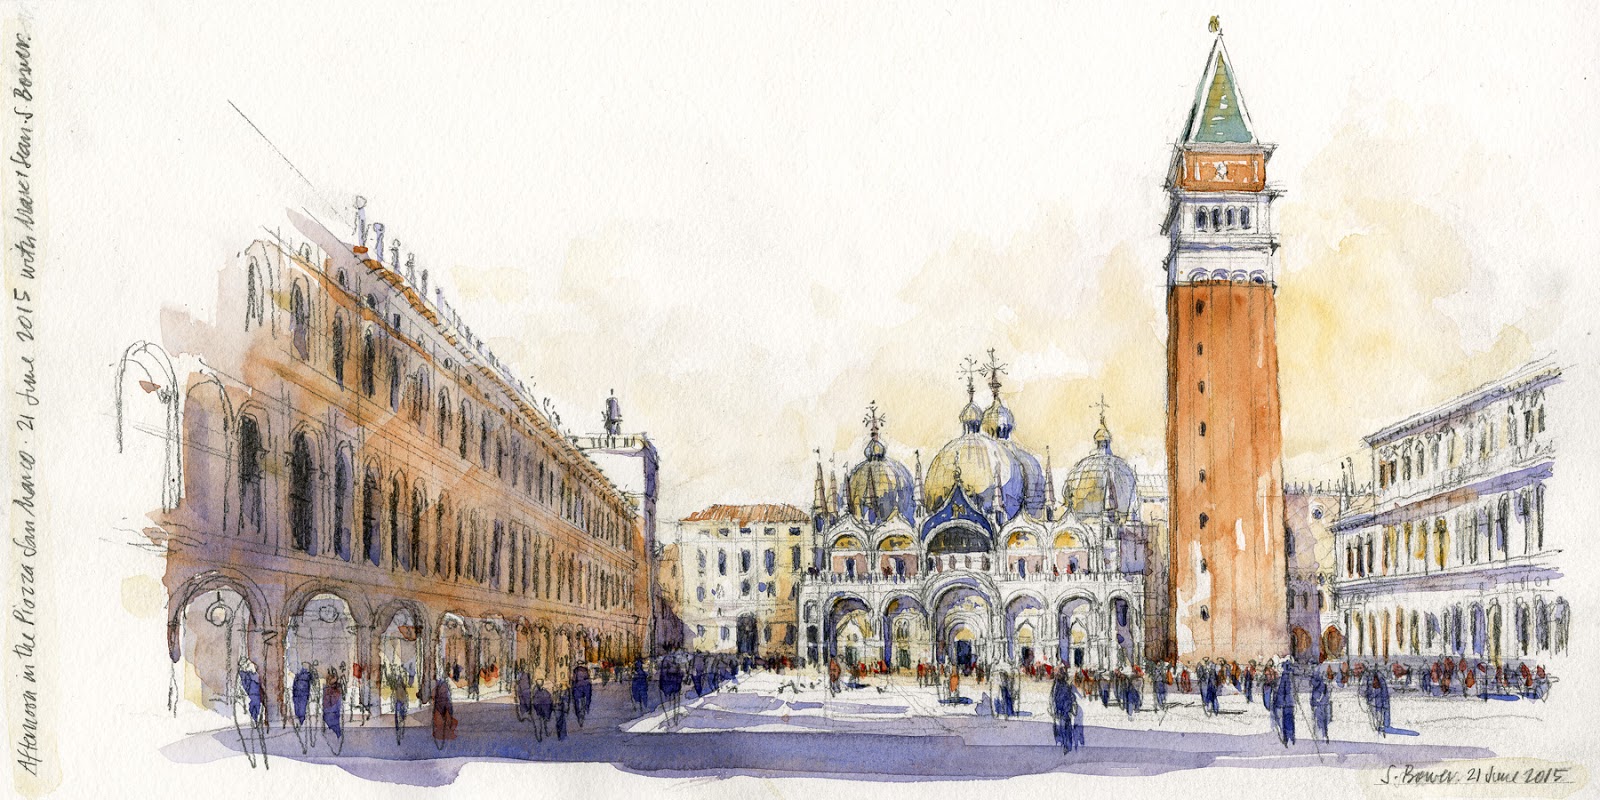
Venice in 2015, sketching what may be one of the most famous towers in the world, the Campanile in the Piazza San Marco.
Here I am on the left, sitting in spot of great honor with the incredible Marc Taro Holmes and his friend and mind-boggling illustrator, Sean Andrew Murray. HA! No pressure at all !?!?

You can see how I don't just see the face of the sides of the tower, I see it as a stack of 3-dimensional blocks. 
Remember one or both sides of your tower will go to the vanishing point/s on your eye level.
Consider, each face of the tower steps inward toward the center from one layer to the next.


And here are the steps I use to draw the tower:

1 -- Start with the blocks, as above.
2 -- Use diagonals to find the center of each block.
3 -- draw in your center line all the way to the top of the tower.
4 -- Here, once I find the top of the center line, I can just connect it to the corners to get the pyramid shape at the top. This is easier because the faces of the pyramid are sloped.

I don't always draw every level like this, but it's important to understand this concept when you sketch a tower.


Method 2 -- Use Edges
     In reality, I probably use a combination of methods 1 and 2. This way is definitely easier... I look at the edges and where they are relative to each other. Examine how much each is set in from the level below it. 
     And at the end, I look at where the top of the tower is relative to the layers below, just to check I've got it right.


In this sketch of a tower at the Mezquita in Córdoba, Spain, you can see 
how each corner is set in from the one below it. An easy way to draw 
towers, although be careful you don't pull the layers off center!

Hopefully, one or both of these methods will help you see towers a little differently, and draw them better!

Saturday, July 7, 2018

TIP 6/10: Sloped Roofs in Perspective


Sketching Tip #6:  Sloped Roofs in Perspective

Sketching a sloped roof, or any sloped surface, can be a real challenge. I pretty much always draw lines down the slope of the roof so that the angle of the roof reads, no matter what the roof material is. The clearest way to understand this is to look at tile roofs with ridges and valleys, like this one at Brunelleschi's  Pazzi Chapel in Florence in this classic, one-point perspective view.

Step one is to find the vanishing point and your eye level for most of the parallel horizontal building and ground lines. My eye level line was very low, close to the ground, and the VP just to the right of center.


To draw the slope of the roof correctly, the first line I draw on the sloped roof is a true vertical line (in yellow) directly above my vanishing point at eye level... yep, straight up and down right over my vanishing point! 
Then, I know that all the ridges and valleys to the left of this line angle in one direction, and all the lines to the right of this vertical line angle in the other direction. The farther the line is away from my vertical, the flatter the angle.  I usually eye-ball this. 
Take a look...


So what is really going on here? Remember that lines that are parallel to each other converge to the same vanishing point, so since the roof is angled, it goes to its own vanishing point in the sky...

Remember this tip: 
if a surface tilts UP and away from you, the Vanishing Point also tilts UP.
The part that most people don't realize is that the vanishing point for the slope is directly over your eye level vanishing point!!


This principle is also true for 2-point perspectives, but it's easiest to see in a 1-point view.

Look at this view from Florence and see if you can find the vanishing point and how I drew the tile roofs!


Thursday, July 5, 2018

TIP 4/10: Lines Get Flatter at your Eye Level

Welcome to today's sketching tip~

#4: Lines Get Flatter at your Eye Level

Well, technically speaking, lines and shapes appear flatter the closer they are to your eye level. In perspective-speak, 
this is called "foreshortening", and it's another reason why knowing where your Eye Level Line is can be so helpful.

The sketch that comes to my mind regarding this concept is one from the interior at the Duomo in Orvieto, Italy. I only had a little over an hour to do this sketch, so sitting on the floor midst bird poop at the very back of the cathedral, I relied heavily on knowing about foreshortening.  

Let's analyze this view.


First, know where your eye level is and draw that line all the way across your page as you start your sketch. I do this every time, be it in a sketch or an architectural Illustration. It's helpful in so many ways. You can see where I drew this line in lightly in my sketch (highlighted in turquoise in the mark-up). In most of your sketches, your eye level will probably be close to the floor and very low on your sketchbook page.

Now that I know where my eye level line is, I know that 
-- receding lines ABOVE it will angle DOWN to my vanishing point in the distance, and 
-- receding lines BELOW it will angle UP to my vanishing point.

I also know that :
--  lines will appear flatter the closer they are to my eye level, again, a useful reference (especially in a two-point perspective when the vanishing points are off your sketchbook page!)

Try drawing in your Eye Level Line in your sketches, then you'll know that even when the vanishing point is way off your page, as in a two-point perspective, you KNOW the receding lines will get flatter the closer they are to your eye level.

And, referring back to Tip #3, you'll see that the people who are closest to me appear a little taller...this is because I was sitting on the ground!

I invite you to please sign up for this listserve to receive regular posts about sketching, perspective, painting, workshops and more! Thank you!!