Stephanie Bower


Stephanie Bower | Architectural Illustration: www.stephaniebower.com | Sketching Workshops: www.stephaniebower.com | Sketches: on Instagram at @stephanieabower & http://www.flickr.com/photos/83075812@N07/ | Urban Sketchers Blog Correspondent www.urbansketchers.org | Signature member of the Northwest Watercolor Society
Showing posts with label Good Bones. Show all posts

Friday, January 25, 2019

Announcing New Workshop: San Antonio TX in April at The Pearl


GOOD BONES SAN ANTONIO Texas Perspective + Watercolor Sketching Workshop

April 5-6-7, 2019 |

Good sketches start with Good Bones! In this workshop, you’ll learn the simple steps to set up the foundations of a great architectural sketch in Perspective and Watercolor. How do you start a location sketch? Where is the darn Vanishing Point? Watercolor is too overwhelming!


Held in the amazing historic PEARL DISTRICT along the Riverwalk, this workshop offers 2 full days of instruction. The first day is devoted to learning the fundamentals of on-location perspective through demos and sketching on-site. Day two introduces basic watercolor mixing and techniques. Day 3 is a half day that puts it all together in an open sketch meet up!

GOOD BONES Day 1 | PERSPECTIVE | Friday, April 5 | 9am - 4pm* | Meet in front of Cure
·       Learn perspective basics and a simple step-by-step process to construct an architectural perspective sketch, how to build the sketch in layers.
·       Learn what to look for when sketching perspective on location—how to find your eye level and vanishing points to provide the good bones of any sketch.
·       Learn how to measure proportions and relationships of spatial elements.

GOOD BONES Day 2 | WATERCOLOR | Saturday, April 6 | 9am - 4pm*
·       Introduction to basic watercolor tools and techniques, using a simple palette of colors.
·       Learn how to use watercolor to enhance the sense of architecture and space in your sketches.
·       In the afternoon, put perspective and watercolor together.                                            * One hour break for lunch.

GOOD BONES Day 3 | OPEN SKETCHCRAWL | Sunday, April 7 | 10am – 12:30pm  Anyone can join us!
·       An important half day to cement what you’ve learned, joined by other sketchers.

----------------------------------------------------------------------------------------------------------------------------------------------------
GOOD BONES SAN ANTONIO is open to 15 participants with any level of experience, but it’s targeted to sketchers who want to improve their basic sketching and understanding of perspective and watercolor.

Workshop Registration opens SUNDAY, February 3, 2019 at 12noon central time. 
To sign up, contact Stephanie by email at stbower@comcast.net  The first 15 emails will be accepted—first come, first served. A waiting list will be created in case spots open up.
Workshop fee is $230.00 payable by check once you are notified via email of a confirmed spot in the workshop.

Cancellation
In the unforeseen event the workshop is cancelled, all fees will be reimbursed.
If you have to cancel your participation, please contact Stephanie Bower at stbower@comcast.net
     By March 1, all fees reimbursed; By March 14, 50% of fee reimbursed; After March 14, 10% of workshop fee reimbursed.
                                    
A materials supply list and additional information will be emailed to registered participants.

----------------------------------------------------------------------------------------------------------------------------------------------------
Workshop Instructor, STEPHANIE BOWER is an award-winning Seattle USA- based architectural illustrator, teacher, author, watercolor painter, and traveling Urban Sketchers correspondent.

Stephanie’s sketching workshops bring together her professional career as an architect and architectural illustrator, her many years of teaching in colleges and universities in NYC and Seattle, and her love of traveling and sketching on location. She was the recipient of the 2013 Gabriel Prize fellowship in Paris and was twice awarded the AIA Dallas KRob delineation competition for Best Travel Sketch.

She is a blog correspondent for the Urban Sketchers www.urbansketchers.org and has taught at the international symposiums in Brazil, Singapore, Manchester UK, Chicago, Taiwan, and Amsterdam 2019, as well as workshops/demos in Australia, Oxford UK, Mumbai, Spain, and an annual workshop in Italy. You can also find her two online classes at www.Bluprint.com.

In addition, Stephanie is the author of the fourth book in the popular Urban Sketching Handbook series, Understanding Perspective and is working on another book due to be published in late 2019. 
For more on Stephanie’s work and workshops, go to www.stephaniebower.com.

++++++++++++++++++++++++++++++++++++++++++++++++++++++++++++++++++++++++++++

This workshop is in a FABULOUS location! The Pearl District in San Antonio is one of the best urban spaces in the country. Beautiful renovated old buildings, farmer's market, cafes and shops, interesting architecture, all along the glorious San Antonio Riverwalk. I hope you can join me!!


Sunday, November 18, 2018

Presenting Perspective at Daniel Smith, Seattle on December 2, 2018


MARK YOUR CALENDARS for this free demo!

SIMPLE TIPS THAT EVERY ARTIST NEEDS TO KNOW ABOUT PERSPECTIVE
Sunday, December 2, 2018
11:00 am - 12:30 pm
at Daniel Smith Artist Supplies, Seattle store

I'll be giving an interactive lecture on my favorite sketching tips and tricks for understanding perspective. Bring a pencil and sketchbook, as you'll be drawing too!!!

Hope to see you there!

Friday, July 13, 2018

TIP 8/10: Towers are like Wedding Cakes


Only three more to go! Here is sketching tip #8 of 10...

Sketching Tip #8: Towers are like Wedding Cakes!


Imagine a wedding cake...if one layer is off-center from the one below it, eventually we'd get a tragic cake collapse and wedding disaster!


Same for Towers. I often see towers in sketches that somehow look a little off. The reason: it's layers are not stacked properly in perspective!

So how to better sketch a tower? I'll show you two ways.

Method 1 -- find the center of the tower.
     As in wedding cakes, it's important to establish where the center of the tower is in order to draw it properly. We do this in perspective by using your skills from middle school geometry class:  drawing diagonals.
     If you think of the forms as transparent, this is much easier. I look at a tower and I think of a stack of 3-d blocks, usually getting smaller/narrower toward the top. I often lightly draw in the entire center line up the arch for reference. You can be sure whatever detail is at the very top of the tower, it sits on top of your center line!


Venice in 2015, sketching what may be one of the most famous towers in the world, the Campanile in the Piazza San Marco.
Here I am on the left, sitting in spot of great honor with the incredible Marc Taro Holmes and his friend and mind-boggling illustrator, Sean Andrew Murray. HA! No pressure at all !?!?

You can see how I don't just see the face of the sides of the tower, I see it as a stack of 3-dimensional blocks. 
Remember one or both sides of your tower will go to the vanishing point/s on your eye level.
Consider, each face of the tower steps inward toward the center from one layer to the next.


And here are the steps I use to draw the tower:

1 -- Start with the blocks, as above.
2 -- Use diagonals to find the center of each block.
3 -- draw in your center line all the way to the top of the tower.
4 -- Here, once I find the top of the center line, I can just connect it to the corners to get the pyramid shape at the top. This is easier because the faces of the pyramid are sloped.

I don't always draw every level like this, but it's important to understand this concept when you sketch a tower.


Method 2 -- Use Edges
     In reality, I probably use a combination of methods 1 and 2. This way is definitely easier... I look at the edges and where they are relative to each other. Examine how much each is set in from the level below it. 
     And at the end, I look at where the top of the tower is relative to the layers below, just to check I've got it right.


In this sketch of a tower at the Mezquita in Córdoba, Spain, you can see 
how each corner is set in from the one below it. An easy way to draw 
towers, although be careful you don't pull the layers off center!

Hopefully, one or both of these methods will help you see towers a little differently, and draw them better!

Wednesday, July 4, 2018

TIP 3/10: Heads Align at YOUR Eye Level and more...


Welcome to a series of 10 blog posts with tips for better sketching!

#3 : Heads Align at YOUR Eye Level...and more...

Now that you know how to find your eye level, lets look at using that line to place people into your sketches. The eye level line is something we see all the time but don't really notice how it works in sketching on location. It's a true "ah-ha" moment for lots of people in my classes.

Let's say you are about to start a sketch...

     --you are standing 
     --the ground is more or less flat
     --there are lots of other people in your view who are approximately your height, give or take a foot.

See the view below of a charity run in Florence this summer. This is a super common kind of view for lots of sketchers, and it's called an "eye level view". You are looking straight ahead, not up or down.


An interesting phenomenon happens with an eye level view, and it's something that can help you understand both where your eye level line is in the view and also how to draw all the people.

In an eye level view, all the heads align on the same horizontal line, which is also.... at YOUR EYE LEVEL! So "Horizon Line" + your "Eye Level Line" and all those heads in the view are all the same!
This means that in this photo, I was standing, the ground was more or less flat, and everyone was close to my height, between 5'-6' tall. No matter where their feet fall in the view, or if they are close to you or far away from you, the heads align...take a look!


Knowing this makes it sooooo much easier to populate your sketches with people, which is so important for understanding the size and scale of the things we see and sketch. It's part of why I ALWAYS draw my eye level line across the page in my sketches.


And here is the sketch...the heads all more or less align whether they are close to me or far away.


LOOKING UP -- When your eye level is BELOW everyone else's:
Let's also take a quick look at what happens when you are sitting and your eye level is lower than all those people standing. My eye level when sitting is about the height of a door handle, or maybe around someone's belly button. This view, when looking UP a bit, is often referred to as a "worm's eye view".


You can see in this view that relative to my eye level (in turquoise) the people who are closest to me have heads that appear the farthest above my eye level, and the people in the distance have heads that are closer to my eye level line.


Not a lot of people in this sketch, but you can see the people closest to me on the left are higher
than the people in the distance (tiny, I know...)


LOOKING DOWN -- When your eye level is ABOVE everyone else's:
Back to Venice... let's look at what is called an "aerial view" in which your eye level (in turquoise) is way above everyone else's eye level. (At the horizon!)

In this view, you can see that people follow the general rules of perspective, that things closest to us are bigger, and things farther away are smaller. BUT, we also see that the people closest to us appear lower in our sketch/photo, with their heads farthest away from your eye level line.
The people in the distance are not only smaller, but they appear closer to your eye level line, or higher in your sketch/photo.


Knowing these simple tips will make it MUCH easier for you to place people in your sketches!!

Also, sign ups for my workshop in Seattle, Good Bones, open July 5! Email me at stbower@comcast.net  thanks!


Tuesday, July 3, 2018

TIP 2/10: Think EYE LEVEL, not Horizon Line

Welcome to a series of ten blog posts with tips for better sketching!

#2: Think Eye Level, not Horizon Line


Most people who know even a bit about perspective have heard about the "Horizon Line". We know that the vanishing points are supposed to be on the Horizon Line, but it's a vague concept that many of us don't understand very well.


Let's unpack this...


The Horizon Line is literally the horizon, where the land/water meet the sky. Imagine you are at the beach and looking out at the ocean, or in Venice looking out at the sea...where the water meets the sky in the distance is the horizon line.


The problem with this term is that it's not particularly relevant to location sketching since most of the time, we can't see where the water or land meet the sky! Buildings, mountains, almost everything we see block our view of this important line in the distance.

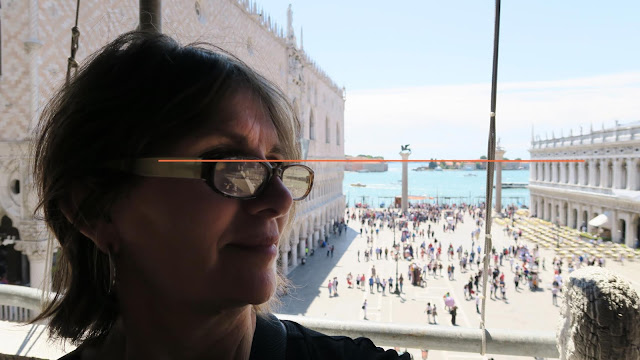
Lucky for us, we have a unique relationship to the Horizon Line...the Horizon Line aligns with your eye level!!!!

Yes, your horizon line is the SAME as your EYE LEVEL LINE, no matter how high or low you are above the ground. Take a look at this photo from the Basilica San Marco in Venice...I'm standing on an upper floor looking down, but the line where the water meets the sky is at my eye level. 


When you are sketching, find your eye level by holding your pencil/pen directly in front of your eyes, without tilting up or down, and pin that line like the game "pin the tail on the donkey" onto something in your view. Then draw your eye level line as a horizontal line all the way across your sketch. It will come be useful in many ways. Once you know where your eye level line is, it's much easier to find your vanishing points too, as most VP's will live on this line.

This is what makes perspective so interesting to me, as the structure of the sketch is literally dependent on YOUR eye level, your viewpoint, your "perspective". And perspective is not hard, once you know what to look for...


Monday, July 2, 2018

TIP 1/10: LONG LINES

Welcome to a series of ten blog posts with tips for better sketching!

#1: Long Lines


Let's start at the beginning, the foundation of any sketch... a good line! A good line 
not only defines shapes and detail, it conveys a sense of energy and personality. Let's talk about how to make LONG LINES, as this can be a challenge when working on location or in a sketchbook.

Method 1-- USE A STRAIGHT EDGE FOR SPEED

Anyone who has seen me sketch knows I rely on a straight edge for making long and accurate lines at the beginning of a sketch. I use an  8" 30/60 degree Architect's Triangle that I carry in my waterproof zipper bag with my pencil and sketchbook.

Using this tool started for me with this sketch, at Fatehpur Sikri near Agra, India in 2011.


Looking at this amazing expanse of space and architecture, I was faced with a huge sketch some 24' wide. I struggled quite a bit with getting long lines...it was taking forever and frankly, they looked awful! In a moment of desperation, I pulled out a small triangle I was carrying, and voilá, I could snap long, straight lines QUICKLY! Speed is the key. I do this at the beginning of a sketch to SPEED UP and also add energy and some accuracy to my line quality. 

Try:

-- Using LIGHT lines at the beginning, architects call them "construction lines", as you lay down the foundation of your sketch.

--I use the straight edge at the beginning of my sketch to set up the big shapes in perspective, then I put it away and just DRAW. Drawing without the straight edge is important for adding character to your drawing as it imbues your sketch with the qualities of your unique hand!


--Work quickly. If you find using this tool slows you down, then ditch it! It's not perfection, it's about speed.


These are the foundation lines of my chiesa sketch in Civita di Bagnoregio, where I teach a workshop every summer.

You can see the long, straight lines done at the beginning of the sketch, then how I go over those guidelines with freehand lines to add the information and character. You can also see my trusty triangle and pencil.

Method 2: CLOSE BUT NOT TOUCHING
Our hands and arms naturally want to make long lines that are curved, based on the radius of our arms. We can learn to compensate for this curve by intentionally drawing UP as the line gets longer, or an easier and more successful way is to draw lines in segments.

In the piazza of the Italian town of Casaprotta, zoom in and you can see the long lines of the border are actually drawn in segments. Instead of OVERLAPPING the line, which makes the overlap look really obvious, pick up your pencil or pen and ever so slightly separate the lines with a tiny bit of space. Your eye will naturally connect the two, and you won't perceive the gap!


Long lines of the border are drawn in segments to keep the long line straight! Wiggles are OK and can add energy to the line.
Below, you can see how the long line is made in slightly separated segments, and the lower line tends to show the overlap. These are drawn with a .5 mechanical pencil, a fine line, so it is a little hard to see these difference, but with a thicker pencil or pen, they become very obvious!!


Try using these methods to draw long lines in your next sketch!


Here they come, 10 Top Sketching Tips

Are you ready?

To jumpstart summer sketching in the northern parts of the world, and because the Urban Sketchers symposium starts in about 3 weeks (so sorry not to see everyone this year, but look for me in Asia in October!), I'm launching a series of 10 posts with my favorite 10 sketching and perspective tips!

I often see lots of the same questions and challenges come up time and again in workshops, so I decided to collect some of my responses into these posts. 

Thanks to my friends Marc Taro Holmes, Liz Steel, and Suhita Shirodkar who did a month(!) of beautiful painting sketches called "Direct to Watercolor", you are my inspiration for this.

And of course, I invite you to sign up for future blog posts.

Thanks for your interest --  I hope you find these helpful!
Stephanie

Wednesday, May 31, 2017

Good Bones and more in Melbourne

After Adelaide, I headed to Melbourne to teach a workshop...location was the University of Melbourne campus, close to the home in North Melbourne of my wonderful host, Angela Williams.  THANK YOU, Angela, for bringing me here and for taking such great care of me! It was such wonderful fun!! 

The weather looked iffy ( I hoped for late summer weather but instead got early fall weather...global climate change makes it impossible to predict!), so I spent a lot of time scoping out locations under cover should it rain. 


Practicing in the Old Quad on campus.
In the end, the Old Quad and the Old Arts Building were perfect locations for our 2 days of workshop and Sunday morning of what turned out to be a HUGE sketchcrawl! It was great to meet so many talented sketchers in Melbourne.

The workshop group was great fun, coming all the way from Perth, Brisbane, outside Melbourne, Canberra...I was so honored that folks traveled to get here!

Another highlight of my time in Melbourne was giving a talk about my work and sketching at the offices of world famous engineers, ARUP. Thanks again to Angela, who has worked here for 10 years and was kind enough to set up this opportunity. We had a large crowd after work, and they stayed until the bitter end!

Here are some of my Melbourne sketches, plus a few photos!


Another warm up sketch before the workshop, in the Old Quad. I used the front arch as a frame,
in my Pentalic sketchbook.


Lovely Meet & Greet the evening before the workshop started!


Our group at the Old Quad!

I love this view of the hardworking group sketching inside the Quad.
Me, doing a demo for the workshop...


Day 2, Watercolor at outdoor tables on campus...
Some examples of the many beautiful sketches done by this group! My goal is for them to not draw like me, but to draw in their style but BETTER for having a better understanding of perspective and color.

Very quick sketch while on my way to the ARUP offices to give a lecture. This is the Royal Exhibition Hall...
Great turnout for the Sunday morning open sketch crawl!!!


My sketchcrawl sketch of the Old Arts building Tower.

Thank you sketchers in Melbourne, thanks to the University of Melbourne for allowing us to draw on campus,
and thanks to Angela Williams for being so kind and generous and all her hard work!!