Stephanie Bower


Stephanie Bower | Architectural Illustration: www.stephaniebower.com | Sketching Workshops: www.stephaniebower.com | Sketches: on Instagram at @stephanieabower & http://www.flickr.com/photos/83075812@N07/ | Urban Sketchers Blog Correspondent www.urbansketchers.org | Signature member of the Northwest Watercolor Society
Showing posts with label Workshop. Show all posts

Friday, January 25, 2019

Announcing New Workshop: San Antonio TX in April at The Pearl


GOOD BONES SAN ANTONIO Texas Perspective + Watercolor Sketching Workshop

April 5-6-7, 2019 |

Good sketches start with Good Bones! In this workshop, you’ll learn the simple steps to set up the foundations of a great architectural sketch in Perspective and Watercolor. How do you start a location sketch? Where is the darn Vanishing Point? Watercolor is too overwhelming!


Held in the amazing historic PEARL DISTRICT along the Riverwalk, this workshop offers 2 full days of instruction. The first day is devoted to learning the fundamentals of on-location perspective through demos and sketching on-site. Day two introduces basic watercolor mixing and techniques. Day 3 is a half day that puts it all together in an open sketch meet up!

GOOD BONES Day 1 | PERSPECTIVE | Friday, April 5 | 9am - 4pm* | Meet in front of Cure
·       Learn perspective basics and a simple step-by-step process to construct an architectural perspective sketch, how to build the sketch in layers.
·       Learn what to look for when sketching perspective on location—how to find your eye level and vanishing points to provide the good bones of any sketch.
·       Learn how to measure proportions and relationships of spatial elements.

GOOD BONES Day 2 | WATERCOLOR | Saturday, April 6 | 9am - 4pm*
·       Introduction to basic watercolor tools and techniques, using a simple palette of colors.
·       Learn how to use watercolor to enhance the sense of architecture and space in your sketches.
·       In the afternoon, put perspective and watercolor together.                                            * One hour break for lunch.

GOOD BONES Day 3 | OPEN SKETCHCRAWL | Sunday, April 7 | 10am – 12:30pm  Anyone can join us!
·       An important half day to cement what you’ve learned, joined by other sketchers.

----------------------------------------------------------------------------------------------------------------------------------------------------
GOOD BONES SAN ANTONIO is open to 15 participants with any level of experience, but it’s targeted to sketchers who want to improve their basic sketching and understanding of perspective and watercolor.

Workshop Registration opens SUNDAY, February 3, 2019 at 12noon central time. 
To sign up, contact Stephanie by email at stbower@comcast.net  The first 15 emails will be accepted—first come, first served. A waiting list will be created in case spots open up.
Workshop fee is $230.00 payable by check once you are notified via email of a confirmed spot in the workshop.

Cancellation
In the unforeseen event the workshop is cancelled, all fees will be reimbursed.
If you have to cancel your participation, please contact Stephanie Bower at stbower@comcast.net
     By March 1, all fees reimbursed; By March 14, 50% of fee reimbursed; After March 14, 10% of workshop fee reimbursed.
                                    
A materials supply list and additional information will be emailed to registered participants.

----------------------------------------------------------------------------------------------------------------------------------------------------
Workshop Instructor, STEPHANIE BOWER is an award-winning Seattle USA- based architectural illustrator, teacher, author, watercolor painter, and traveling Urban Sketchers correspondent.

Stephanie’s sketching workshops bring together her professional career as an architect and architectural illustrator, her many years of teaching in colleges and universities in NYC and Seattle, and her love of traveling and sketching on location. She was the recipient of the 2013 Gabriel Prize fellowship in Paris and was twice awarded the AIA Dallas KRob delineation competition for Best Travel Sketch.

She is a blog correspondent for the Urban Sketchers www.urbansketchers.org and has taught at the international symposiums in Brazil, Singapore, Manchester UK, Chicago, Taiwan, and Amsterdam 2019, as well as workshops/demos in Australia, Oxford UK, Mumbai, Spain, and an annual workshop in Italy. You can also find her two online classes at www.Bluprint.com.

In addition, Stephanie is the author of the fourth book in the popular Urban Sketching Handbook series, Understanding Perspective and is working on another book due to be published in late 2019. 
For more on Stephanie’s work and workshops, go to www.stephaniebower.com.

++++++++++++++++++++++++++++++++++++++++++++++++++++++++++++++++++++++++++++

This workshop is in a FABULOUS location! The Pearl District in San Antonio is one of the best urban spaces in the country. Beautiful renovated old buildings, farmer's market, cafes and shops, interesting architecture, all along the glorious San Antonio Riverwalk. I hope you can join me!!


Tuesday, July 17, 2018

TIP 10/10: Domes are ROUND!


And here is the final post in this series of 10 TIPS!

Sketching Tip #10: Domes are ROUND!

This may seem rather obvious, but I see so many sketchers draw domes as sort of flattened out the shapes in which the "edges" are drawn as if they were sharp corners instead of rounded.

Domes are essentially a stack of ellipses, each ellipse sharing a common centerline. Take a look at this diagram of the round Radcliffe Camera done in my workshop in Oxford, England last year:


You'll notice that this building, similar to a dome, is a stack of ellipses in perspective.
All the ellipses are centered on one line in the middle that also connects the
very top of the dome with the center of the footprint of the building on the ground.  

You'll also notice that each ellipse gets FLATTER the closer it is to your eye level line.

Understanding this concept points out why the diagram of the flattened dome with "corners" is incorrect, and the rounded dome edge below works much better!


Domes don't have sharp corners!!


The "edges" of your dome should look more like this. They are rounded and
you can see the shape of the ellipse starting to curve behind the building.

And here is the completed sketch! You can see and feel the roundedness of the forms, especially by looking at the rounded "edges".


These same concepts apply to any rounded form. Take a look at this sketch of a building near Piccadilly Circus in London...


I hope you have enjoyed and learned a bit from these 10 blog posts! I will continue to post tips and more sketches, so please sign up to receive these posts by email using the sign up on the bar on the right.

And if you want to learn in person, I'll be teaching workshops next year in Spain and Italy...and more places too! 
I also have two online classes at Craftsy.com and a book you can find anywhere, 
The Urban Sketching Handbook: Understanding Perspective.

Thank you so much for your interest, and Happy Sketching!
Remember, don't fear perspective!!
Stephanie


Friday, July 13, 2018

TIP 8/10: Towers are like Wedding Cakes


Only three more to go! Here is sketching tip #8 of 10...

Sketching Tip #8: Towers are like Wedding Cakes!


Imagine a wedding cake...if one layer is off-center from the one below it, eventually we'd get a tragic cake collapse and wedding disaster!


Same for Towers. I often see towers in sketches that somehow look a little off. The reason: it's layers are not stacked properly in perspective!

So how to better sketch a tower? I'll show you two ways.

Method 1 -- find the center of the tower.
     As in wedding cakes, it's important to establish where the center of the tower is in order to draw it properly. We do this in perspective by using your skills from middle school geometry class:  drawing diagonals.
     If you think of the forms as transparent, this is much easier. I look at a tower and I think of a stack of 3-d blocks, usually getting smaller/narrower toward the top. I often lightly draw in the entire center line up the arch for reference. You can be sure whatever detail is at the very top of the tower, it sits on top of your center line!


Venice in 2015, sketching what may be one of the most famous towers in the world, the Campanile in the Piazza San Marco.
Here I am on the left, sitting in spot of great honor with the incredible Marc Taro Holmes and his friend and mind-boggling illustrator, Sean Andrew Murray. HA! No pressure at all !?!?

You can see how I don't just see the face of the sides of the tower, I see it as a stack of 3-dimensional blocks. 
Remember one or both sides of your tower will go to the vanishing point/s on your eye level.
Consider, each face of the tower steps inward toward the center from one layer to the next.


And here are the steps I use to draw the tower:

1 -- Start with the blocks, as above.
2 -- Use diagonals to find the center of each block.
3 -- draw in your center line all the way to the top of the tower.
4 -- Here, once I find the top of the center line, I can just connect it to the corners to get the pyramid shape at the top. This is easier because the faces of the pyramid are sloped.

I don't always draw every level like this, but it's important to understand this concept when you sketch a tower.


Method 2 -- Use Edges
     In reality, I probably use a combination of methods 1 and 2. This way is definitely easier... I look at the edges and where they are relative to each other. Examine how much each is set in from the level below it. 
     And at the end, I look at where the top of the tower is relative to the layers below, just to check I've got it right.


In this sketch of a tower at the Mezquita in Córdoba, Spain, you can see 
how each corner is set in from the one below it. An easy way to draw 
towers, although be careful you don't pull the layers off center!

Hopefully, one or both of these methods will help you see towers a little differently, and draw them better!

Friday, July 6, 2018

TIP 5/10: When Buildings Twist, Multiple Vanishing Points!


Welcome to a series of 10 Sketching Tips!

#5: When Buildings Twist

Key to this concept is to remember a basic principle of perspective, that lines that are parallel to each other appear to converge to the same point.

Quick trip back to Venice. I'm standing on the upper level of the Basilica San Marco. Using my pencil, I extend the receding lines on the left side to find one vanishing point on my eye level line.


Then I use my pencil to extend the lines of the building on the right, and what happens? I get TWO vanishing points, both on my eye level line!  
So, what does this mean? It means the two buildings are actually not parallel to each other in plan (like a map view)... each facade has generated it's own vanishing point. 
Key also is that BOTH vanishing points are on my eye level line--yet another good reason to mark where your eye level line (aka Horizon Line) is located in your sketch!

Does using the two VP's for this sketch make a huge difference? Probably not, as they are so close to each other. The only way I could have realized this was by drawing it!! BUT this concept in perspective is extremely helpful to understand when you are sketching anywhere that was not built on a grid plan, like most of Europe, India, and many other places in the world.


Let's look quickly at another example in Italy. This is Civita di Bagnoregio, an amazing tiny hilltown north of Rome where I teach a sketching workshop every summer. This view is of the narrow main street behind the church. The buildings twist and turn in plan along a curving pedestrian street.

This is a diagram I made in the workshop to explain the concept of multiple vanishing points. I used my pencil to extend the vanishing lines (usually using the tops or bottoms of windows or stone courses), and lo and behold, I get three separate VP's, each on my eye level line, one for each building.


Here is a break down of the three VP's...

In summary, it's easiest to remember that when:
--the building rotates in plan toward the left, the VP shifts to the left along your eye level line
--the building rotates in plan toward the right, the VP also shifts to the right along your eye level line.

I hope this explanation helps! Happy Sketching!
To receive these and future posts, please sign up!


Thursday, July 5, 2018

TIP 4/10: Lines Get Flatter at your Eye Level

Welcome to today's sketching tip~

#4: Lines Get Flatter at your Eye Level

Well, technically speaking, lines and shapes appear flatter the closer they are to your eye level. In perspective-speak, 
this is called "foreshortening", and it's another reason why knowing where your Eye Level Line is can be so helpful.

The sketch that comes to my mind regarding this concept is one from the interior at the Duomo in Orvieto, Italy. I only had a little over an hour to do this sketch, so sitting on the floor midst bird poop at the very back of the cathedral, I relied heavily on knowing about foreshortening.  

Let's analyze this view.


First, know where your eye level is and draw that line all the way across your page as you start your sketch. I do this every time, be it in a sketch or an architectural Illustration. It's helpful in so many ways. You can see where I drew this line in lightly in my sketch (highlighted in turquoise in the mark-up). In most of your sketches, your eye level will probably be close to the floor and very low on your sketchbook page.

Now that I know where my eye level line is, I know that 
-- receding lines ABOVE it will angle DOWN to my vanishing point in the distance, and 
-- receding lines BELOW it will angle UP to my vanishing point.

I also know that :
--  lines will appear flatter the closer they are to my eye level, again, a useful reference (especially in a two-point perspective when the vanishing points are off your sketchbook page!)

Try drawing in your Eye Level Line in your sketches, then you'll know that even when the vanishing point is way off your page, as in a two-point perspective, you KNOW the receding lines will get flatter the closer they are to your eye level.

And, referring back to Tip #3, you'll see that the people who are closest to me appear a little taller...this is because I was sitting on the ground!

I invite you to please sign up for this listserve to receive regular posts about sketching, perspective, painting, workshops and more! Thank you!!

Tuesday, July 3, 2018

TIP 2/10: Think EYE LEVEL, not Horizon Line

Welcome to a series of ten blog posts with tips for better sketching!

#2: Think Eye Level, not Horizon Line


Most people who know even a bit about perspective have heard about the "Horizon Line". We know that the vanishing points are supposed to be on the Horizon Line, but it's a vague concept that many of us don't understand very well.


Let's unpack this...


The Horizon Line is literally the horizon, where the land/water meet the sky. Imagine you are at the beach and looking out at the ocean, or in Venice looking out at the sea...where the water meets the sky in the distance is the horizon line.


The problem with this term is that it's not particularly relevant to location sketching since most of the time, we can't see where the water or land meet the sky! Buildings, mountains, almost everything we see block our view of this important line in the distance.

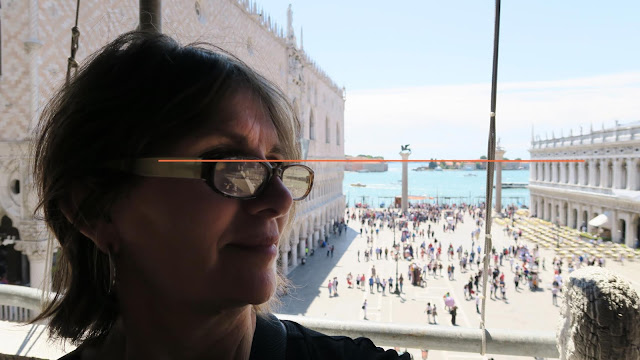
Lucky for us, we have a unique relationship to the Horizon Line...the Horizon Line aligns with your eye level!!!!

Yes, your horizon line is the SAME as your EYE LEVEL LINE, no matter how high or low you are above the ground. Take a look at this photo from the Basilica San Marco in Venice...I'm standing on an upper floor looking down, but the line where the water meets the sky is at my eye level. 


When you are sketching, find your eye level by holding your pencil/pen directly in front of your eyes, without tilting up or down, and pin that line like the game "pin the tail on the donkey" onto something in your view. Then draw your eye level line as a horizontal line all the way across your sketch. It will come be useful in many ways. Once you know where your eye level line is, it's much easier to find your vanishing points too, as most VP's will live on this line.

This is what makes perspective so interesting to me, as the structure of the sketch is literally dependent on YOUR eye level, your viewpoint, your "perspective". And perspective is not hard, once you know what to look for...


Thursday, June 21, 2018

10x10 Fall Workshops in Seattle, Registration Sunday, June 24

We have amazing instructors here in Seattle. If you are in the neighborhood, please consider signing up for these courses. They also benefit Urban Sketchers.org.

Register the minute the registration opens on Sunday morning, June 24 at 9am Seattle time, as the workshops fill VERY quickly!!  I'll be teaching one on watercolor for beginners, 

"Watercolor 101".

10x10 Fall 2018 Workshops


Urban Sketchers Seattle – Fall 2018 10x10 Workshop Program

Seattle’s USk 10x10 workshop program was so overwhelmingly successful in the Spring that we have decided to continue it through the Fall! We are bringing back your favorite instructors from Spring – Steve Reddy, David Chamness, Stephanie Bower, Jane Wingfield, Andika Murandi, Gabi Campanario, Michele Cooper, Sue Heston and Anita Lehmann! In addition, Gail Wong, who taught in the 10x10 program last year, is returning with two sessions, and we have a new instructor, Eleanor Doughty!

The 10x10 workshop program is a worldwide initiative to offer educational workshops wherever sketchers live. Launched in celebration of Urban Sketchers’ 10th anniversary in 2017, the program brings a variety of courses on urban sketching techniques taught by talented local instructors in their home cities.

Registration begins Sunday, June 24, 2018, 9 a.m. The cost for each 3½-hour workshop is $60 plus processing fees. Registration will be processed by the event management website, Brown Paper Ticket. For workshop details and other information, please read the FAQ and download the program PDF.

Important: The email address you provide when you register through Brown Paper Ticket is our only means of communicating with you. We need your current email so that your instructor can contact you with information about where to meet, possible last-minute changes, or other updates. If you prefer that we use a different email address for communication purposes, please contact us at usk.seattle@gmail.com.

Program Goals
1. Improve your skills by drawing from life, on location.
2. Learn how to compose and design your sketch on the page.
3. Experience the advantages of group learning and sharing.
4. Become confident sketching on location so that you can continue sharing stories from your city, one drawing at a time.


Fall 2018 Workshop Date/Start Time
Workshop Title
Instructor
Location (Tentative)
1. Aug. 18, 10 a.m.
Sweeping Views
Gail Wong
Gas Works Park
2. Aug. 19, 10 a.m.
Sweeping Views
Gail Wong
Gas Works Park
3. Aug. 25, 10 a.m.
First Steps in Visual Journaling
Michele Cooper
Occidental Park
4. Aug. 25, 2:30 p.m.
Next Steps in Visual Journaling: Sketching a Montage
Michele Cooper
Occidental Park
5. Aug. 26, 10 a.m.
Watercolor 101
Stephanie Bower
Seattle Center Armory
6. Sept. 8, 10 a.m.
Pocket Sketchbook
Gabi Campanario
Hing Hay Park
7. Sept. 15, 10 a.m.
Sketching People from the Inside Out
Jane Wingfield
Pike Place Market
8. Sept. 16, 10 a.m.
People in Places
Jane Wingfield
Pike Place Market
9. Sept. 22, 10 a.m.
Confident Contours
Steve Reddy
Wallingford Center
10. Sept. 29, 10 a.m.
Drawing People from the Outside In
Sue Heston
Seattle Center Armory
11. Oct. 6, 10 a.m.
Sketch ‘n Chill: No-Stress Interior Sketching
Andika Murandi
Pioneer Square
12. Oct. 13, 10 a.m.
Freedom from Worry: Immerse Yourself & Let the Sketch Flow
David Chamness
Seattle Art Museum
13. Oct. 20, 10 a.m.
From Afar: Rendering Atmospheric Perspective in Watercolor
Eleanor Doughty
Seattle Center Armory
14. Oct. 27, 10 a.m.
A Media Exploration: Charcoal, Ink + Graphite
Anita Lehmann
Georgetown
15. Nov. 3, 10 a.m.
Start a Sketch with Simple Shapes
Sue Heston
Seattle Center Armory
16. Nov. 17, 10 a.m.
Pocket Sketchbook
Gabi Campanario
Hing Hay Park